> For the complete documentation index, see [llms.txt](https://aisviz.gitbook.io/documentation/llms.txt). Markdown versions of documentation pages are available by appending `.md` to page URLs; this page is available as [Markdown](https://aisviz.gitbook.io/documentation/tutorials/weather-data.md).
# Weather Data
Merge ERA5 reanalysis weather variables onto AIS vessel tracks with AISdb's WeatherDataStore, reading GRIB files from disk or fetching them from the Copernicus Climate Data Store.
This tutorial covers merging ERA5 weather variables with AIS vessel tracks using AISdb's `WeatherDataStore`. It reads GRIB files, either ones you already have on disk or ones fetched on demand from the Copernicus Climate Data Store (CDS), and matches wind, precipitation, and other reanalysis fields to each point in a track.
To work with the runnable notebook directly, see [weather.ipynb](https://github.com/MAPS-Lab/AISdb/blob/master/examples/weather.ipynb) in the AISdb repository.
## Prerequisites
You'll need a free Copernicus CDS account to access ERA5 data, obtained through [ECMWF sign-up](https://accounts.ecmwf.int/auth/realms/ecmwf/login-actions/registration?client_id=cds\&tab_id=sBIo0pbduZ8), and a working AISdb install. See the [installation guide](/documentation/default-start/quick-start.md#python-environment-and-installation) if you haven't set that up yet.
`WeatherDataStore` reads GRIB files through `cfgrib`/`xarray`, and downloading from CDS goes through `cdsapi`. Both are regular dependencies of AISdb's weather module, so a standard `pip install aisdb` covers them.
## How it fits together
`WeatherDataStore` (from `aisdb.weather.data_store`) is the entry point for weather enrichment. You give it a list of ERA5 variable short names, a date range, and a folder to read GRIB files from (or write them to). From there it exposes two ways to pull weather values.
* `extract_weather(latitude, longitude, time)` looks up a single point and returns a dictionary keyed by short name, e.g. `{'10u': 5.2, '10v': 3.1}`.
* `yield_tracks_with_weather(tracks)` takes a generator of AISdb track dictionaries (the kind `TrackGen` produces) and yields each track back with a `weather_data` key added, containing the matched values for every point along the track.
GRIB files are expected to be named by month, `yyyy-mm.grib` or `yyyy-mm.grib.zip` (e.g. `2023-08.grib`), sitting in the folder you pass as `weather_data_path`. `WeatherDataStore` works out which months it needs from your `start`/`end` range and loads them all.
### Short names
ERA5 short names are ECMWF's compact identifiers for reanalysis variables, things like `10u` for the 10 metre U wind component or `tp` for total precipitation. `WeatherDataStore` validates every short name you pass against its own lookup table and raises a `ValueError` immediately if one isn't recognized, so a typo fails fast rather than surfacing later as missing data. The full parameter list is documented on the [ERA5 data documentation page](https://confluence.ecmwf.int/display/CKB/ERA5%3A+data+documentation#heading-Parameterlistings).
{% stepper %}
{% step %}
#### Step 1: Import the packages you need
```python
import aisdb
from aisdb import DBQuery
from aisdb.database.dbconn import PostgresDBConn
from datetime import datetime
from aisdb.weather.data_store import WeatherDataStore
```
{% endstep %}
{% step %}
#### Step 2: Connect to the database
```python
db_user = '' # DB user
db_dbname = 'aisviz' # DB schema
db_password = '' # DB password
db_hostaddr = '127.0.0.1' # DB host address
dbconn = PostgresDBConn(
port=5555, # PostgreSQL port
user=db_user, # PostgreSQL username
dbname=db_dbname, # PostgreSQL database
hostaddr=db_hostaddr, # PostgreSQL address
password=db_password, # PostgreSQL password
)
```
`WeatherDataStore` doesn't care which backend your tracks came from, so a `SQLiteDBConn` works exactly the same way here.
{% endstep %}
{% step %}
#### Step 3: Query the tracks
Define the bounding box and time window, then convert the query rows into tracks with `TrackGen`. `TrackGen` returns a generator of dictionaries, one per vessel, each holding the dynamic and static columns for that track.
```python
xmin, ymin, xmax, ymax = -70, 45, -58, 53
gulf_bbox = [xmin, xmax, ymin, ymax]
start_time = datetime(2023, 8, 1)
end_time = datetime(2023, 8, 30)
qry = DBQuery(
dbconn=dbconn,
start=start_time, end=end_time,
xmin=xmin, xmax=xmax, ymin=ymin, ymax=ymax,
callback=aisdb.database.sqlfcn_callbacks.in_time_bbox_validmmsi,
)
rowgen = qry.gen_qry()
tracks = aisdb.track_gen.TrackGen(rowgen, decimate=True)
```
{% endstep %}
{% step %}
#### Step 4: Set up `WeatherDataStore`
`WeatherDataStore` takes the short names you want, the date range, and the folder holding the matching GRIB files. In the 1.8.0-alpha release the GRIB files must already be on disk, one per month of your query range, named `yyyy-mm.grib` (a `.zip` of the same name also works). Download them from the [Copernicus Climate Data Store](https://cds.climate.copernicus.eu/) beforehand, either through the web interface or with the [cdsapi](https://cds.climate.copernicus.eu/how-to-api) client.
```python
weather_data_store = WeatherDataStore(
short_names=['10u', '10v', 'tp'], # U wind, V wind, total precipitation
start=start_time,
end=end_time,
weather_data_path='.', # folder holding yyyy-mm.grib(.zip) files
)
```
`10u` and `10v` are the [10 metre U wind component](https://apps.ecmwf.int/codes/grib/param-db/165) and [10 metre V wind component](https://apps.ecmwf.int/codes/grib/param-db/166), respectively.
{% hint style="info" %}
The development branch of AISdb extends `WeatherDataStore` with a `download_from_cds=True` flag and an `area` keyword (`[xmin, xmax, ymin, ymax]` in degrees), which request exactly the region you need from CDS instead of relying on pre-downloaded files. If you installed from the `master` branch rather than the 1.8.0-alpha release, that shortcut is available. CDS requests queue server-side and can take a while, so for repeated runs it is still faster to download once and reuse the files.
{% endhint %}
{% endstep %}
{% step %}
#### Step 5: Look up a single point
If you just need weather at one latitude, longitude, and timestamp, `extract_weather` returns it directly without touching any tracks.
```python
values = weather_data_store.extract_weather(50.0, -66.75, 1690858823)
print(values)
# {'10u': 1.97, '10v': -0.42, 'tp': array(...)}
```
{% endstep %}
{% step %}
#### Step 6: Merge weather into the tracks
For a full set of tracks, `yield_tracks_with_weather` matches each point's latitude, longitude, and time against the loaded GRIB data and adds a `weather_data` dictionary to every track, keyed by the short names you requested.
```python
tracks_with_weather = weather_data_store.yield_tracks_with_weather(tracks)
for track in tracks_with_weather:
print(
f"'u-component' 10m wind for:\n"
f"lat: {track['lat'][0]}\n"
f"lon: {track['lon'][0]}\n"
f"time: {track['time'][0]}\n"
f"is {track['weather_data']['10u'][0]} m/s"
)
break
weather_data_store.close() # release the open GRIB datasets
```
```
'u-component' 10m wind for:
lat: 50.003334045410156
lon: -66.76000213623047
time: 1690858823
is 1.9680767059326172 m/s
```
Always call `.close()` when you're done. `WeatherDataStore` keeps the underlying `xarray` datasets open for the lifetime of the object, and closing them releases the file handles cleanly.
{% endstep %}
{% endstepper %}
## Why bother merging weather with AIS?
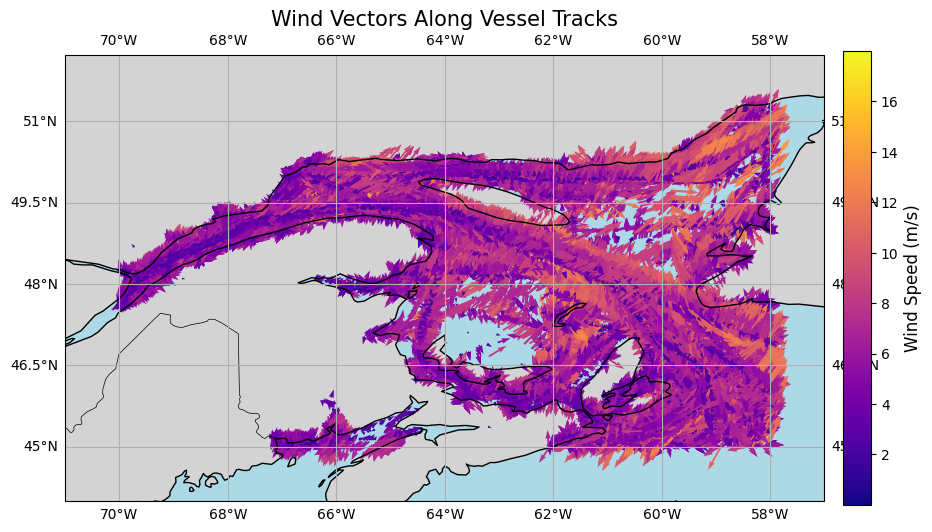
Wind, precipitation, and sea state all shape how vessels move. A ship might slow down or reroute in heavy weather, burn more fuel fighting a headwind, or take a longer path around a storm system entirely. Attaching ERA5 variables directly to AIS tracks lets you study those relationships point by point instead of guessing at conditions from a separate forecast archive, which is useful for route optimization, fuel-efficiency studies, or explaining anomalies in a vessel's speed profile.
U-V 100m component wind over the Gulf of St. Lawrence for Aug 2018
---
# Agent Instructions
This documentation is published with GitBook. GitBook is the documentation platform designed so that both humans and AI agents can read, navigate, and reason over technical content effectively. Learn more at gitbook.com.
## Querying This Documentation
If you need additional information that is not directly available in this page, you can query the documentation dynamically by asking a question.
Perform an HTTP GET request on the current page URL with the `ask` query parameter, and the optional `goal` query parameter:
```
GET https://aisviz.gitbook.io/documentation/tutorials/weather-data.md?ask=&goal=
```
`ask` is the immediate question: it should be specific, self-contained, and written in natural language.
`goal` is optional and describes the broader end goal you are ultimately trying to accomplish on behalf of the user. GitBook uses it to tailor the answer towards what is most useful for that goal.
The response will contain a direct answer to the question and relevant excerpts and sources from the documentation.
Use this mechanism when the answer is not explicitly present in the current page, you need clarification or additional context, or you want to retrieve related documentation sections.