> For the complete documentation index, see [llms.txt](https://aisviz.gitbook.io/documentation/llms.txt). Markdown versions of documentation pages are available by appending `.md` to page URLs; this page is available as [Markdown](https://aisviz.gitbook.io/documentation/tutorials/track-interpolation.md).

# Track Interpolation

Track interpolation with **AISdb** involves <mark style="background-color:yellow;">generating estimated positions of vessels at specific intervals when actual AIS data points are unavailable.</mark> This process is important for filling in gaps in the vessel's trajectory, which can occur due to signal loss, data filtering, or other disruptions.

In this tutorial, we introduce different types of track interpolation implemented in AISdb with usage examples.

## Example data preparation

First, we define functions to transform and visualize the track data (a generator object), with options to view the data points or the tracks:

{% code lineNumbers="true" %}

```python
import plotly.graph_objects as go
import plotly.express as px
import pandas as pd

def track2dataframe(tracks):
    data = []
    for track in tracks:
        times = track['time']
        mmsi = track['mmsi']
        lons = track['lon']
        lats = track['lat']
    
        # Iterate over the dynamic arrays and create a row for each time point
        for i in range(len(times)):
            data.append({
                'mmsi': mmsi,
                'time': times[i],
                'longitude': lons[i],
                'latitude': lats[i],
            })
            
    return pd.DataFrame(data)

def plotly_visualize(data, visual_type='lines'):
    if (visual_type=='scatter'):
        # Create a scatter plot for the vessel data points using scatter_geo
        fig = px.scatter_geo(
            data,
            lat="latitude",
            lon="longitude",
            color="mmsi",  # Color by vessel identifier
            hover_name="mmsi",
            hover_data={"time": True},
            title="Vessel Data Points"
        )
    else:
        # Create a line plot for the vessel trajectory using line_geo
        fig = px.line_geo(
            data,
            lat="latitude",
            lon="longitude",
            color="mmsi",  # Color by vessel identifier
            hover_name="mmsi",
            hover_data={"time": True},
            title="Vessel Trajectory"
        )
    
    # Set the map style and projection
    fig.update_geos(
        projection_type="azimuthal equal area",  # Change this to 'natural earth', 'azimuthal equal area', etc.
        showland=True,
        landcolor="rgb(243, 243, 243)",
        countrycolor="rgb(204, 204, 204)",
    )
    
    # Set the layout to focus on a specific area or zoom level
    fig.update_layout(
        geo=dict(
            projection_type="azimuthal equal area",
        ),
        width=1200,  # Increase the width of the plot
        height=800,  # Increase the height of the plot
    )
    
    fig.show()
```

{% endcode %}

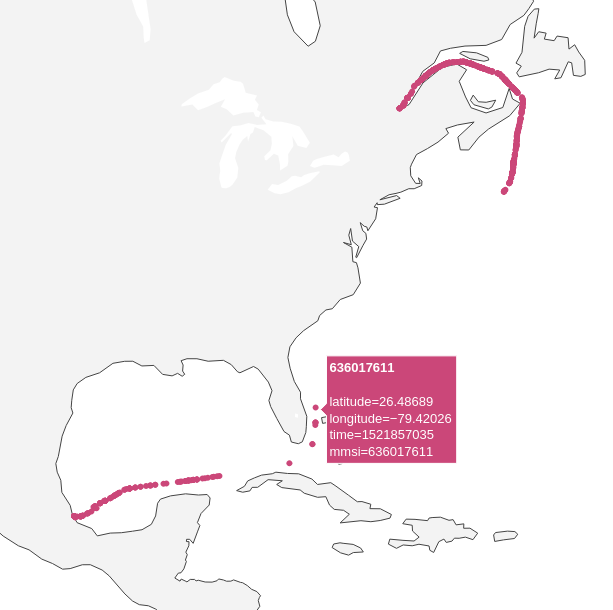
We will use an actual track retrieved from the database for the examples in this tutorial and interpolate additional data points based on this track. The visualization will show the original track data points:

{% code lineNumbers="true" %}

```python
import aisdb
import numpy as np
import nest_asyncio
from aisdb import DBConn, DBQuery
from datetime import timedelta, datetime

nest_asyncio.apply()
dbpath='YOUR_DATABASE.db' # Define the path to your database

MMSI = 636017611 # MMSI of the vessel

# Set the start and end times for the query
start_time = datetime.strptime("2018-03-10 00:00:00", '%Y-%m-%d %H:%M:%S')
end_time = datetime.strptime("2018-03-31 00:00:00", '%Y-%m-%d %H:%M:%S')

with aisdb.SQLiteDBConn(dbpath=dbpath) as dbconn:
    qry = aisdb.DBQuery(
        dbconn=dbconn, start=start_time, end=end_time, mmsi = MMSI,
        callback=aisdb.database.sqlfcn_callbacks.in_timerange_hasmmsi,
    )
    rowgen = qry.gen_qry()
    tracks = aisdb.track_gen.TrackGen(rowgen, decimate=False)
    
    # Visualize the original track data points
    df = track2dataframe(tracks)
    plotly_visualize(df, 'scatter')
```

{% endcode %}

<figure><img src="/files/oSCpEJH1PzA0QAXKdCOB" alt="" width="460"><figcaption><p>Original data points of the vessel track queried from database</p></figcaption></figure>

## Linear interpolation <a href="#linear-interpolation" id="linear-interpolation"></a>

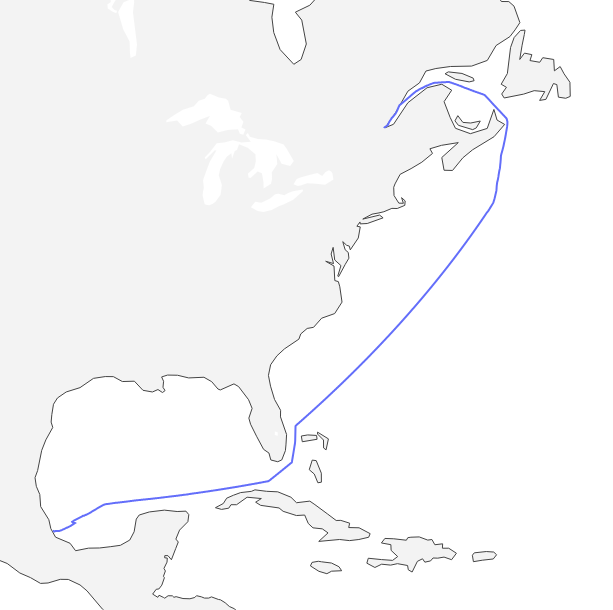
Linear interpolation estimates the vessel's position by drawing a straight line between two known points and calculating the positions at intermediate times. It is simple, fast, and straightforward but may not accurately represent complex movements.

### With equal time window intervals <a href="#with-an-equal-time-window" id="with-an-equal-time-window"></a>

This method estimates the position of a vessel at regular time intervals (e.g., every 10 minutes). To perform linear interpolation with an equal time window on the track defined above:

{% code lineNumbers="true" %}

```python
with aisdb.SQLiteDBConn(dbpath=dbpath) as dbconn:
    qry = aisdb.DBQuery(
        dbconn=dbconn, start=start_time, end=end_time, mmsi = MMSI,
        callback=aisdb.database.sqlfcn_callbacks.in_timerange_hasmmsi,
    )
    rowgen = qry.gen_qry()
    tracks = aisdb.track_gen.TrackGen(rowgen, decimate=False)

    tracks__ = aisdb.interp.interp_time(tracks, timedelta(minutes=10))

    df = track2dataframe(tracks__)
    plotly_visualize(df)
```

{% endcode %}

<figure><img src="/files/Bsom4HdUAdRUaF0qHoCi" alt="" width="460"><figcaption><p>Linear interpolation on the vessel track with equal time intervals</p></figcaption></figure>

### With equal distance intervals <a href="#with-an-equal-space" id="with-an-equal-space"></a>

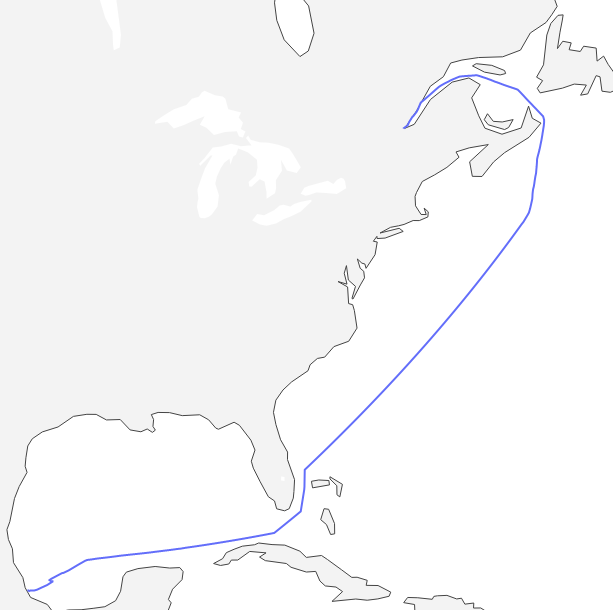
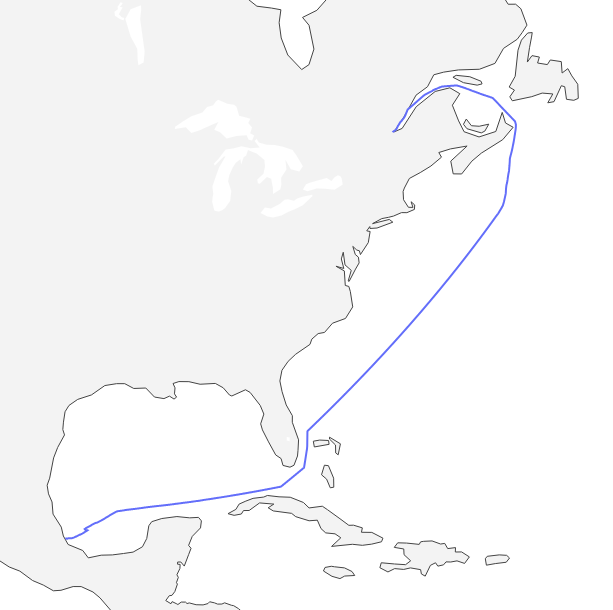
This method estimates the position of a vessel at regular spatial intervals (e.g., every 1 km along its path). To perform linear interpolation with equal distance intervals on the track defined above:
{% code lineNumbers="true" %}

```python
with aisdb.SQLiteDBConn(dbpath=dbpath) as dbconn:
    qry = aisdb.DBQuery(
        dbconn=dbconn, start=start_time, end=end_time, mmsi = MMSI,
        callback=aisdb.database.sqlfcn_callbacks.in_timerange_hasmmsi,
    )
    rowgen = qry.gen_qry()
    tracks = aisdb.track_gen.TrackGen(rowgen, decimate=False)

    tracks__ = aisdb.interp.interp_spacing(spacing=500, tracks=tracks)

    # Visualizing the tracks
    df = track2dataframe(tracks__)
    plotly_visualize(df)
```

{% endcode %}

<figure><img src="/files/p7Ny2oWtpzR6zqIvpnU9" alt="" width="460"><figcaption><p>Linear interpolation with equal distance intervals</p></figcaption></figure>

### Geodesic Track Interpolation <a href="#geometric-track-interpolation" id="geometric-track-interpolation"></a>

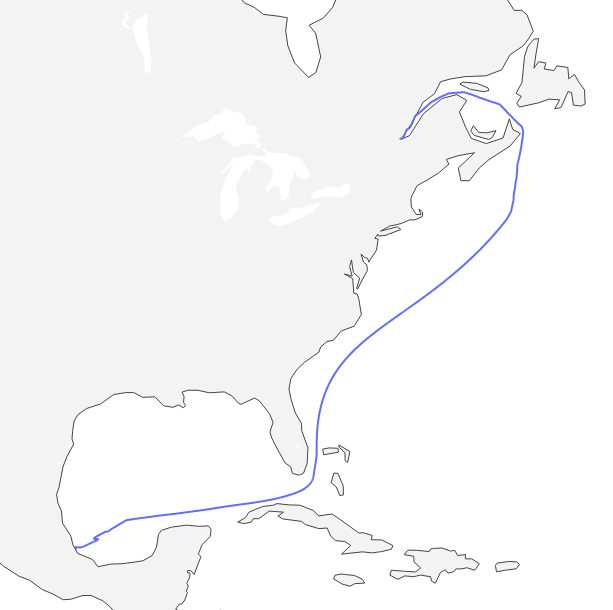
This method estimates the positions of a vessel along a curved path using the principles of geometry, in particular great-circle routes.

{% code lineNumbers="true" %}

```python
with aisdb.SQLiteDBConn(dbpath=dbpath) as dbconn:
    qry = aisdb.DBQuery(
        dbconn=dbconn, start=start_time, end=end_time, mmsi = MMSI,
        callback=aisdb.database.sqlfcn_callbacks.in_timerange_hasmmsi,
    )
    rowgen = qry.gen_qry()
    tracks = aisdb.track_gen.TrackGen(rowgen, decimate=False)

    tracks__ = aisdb.interp.geo_interp_time(tracks, timedelta(minutes=10))

    df = track2dataframe(tracks__)
    plotly_visualize(df)
```

{% endcode %}

<figure><img src="/files/t2erSio4qQwZ21x4eNiE" alt="" width="460"><figcaption><p>Linear interpolation of the vessel track along the geodesic curve</p></figcaption></figure>

## Cubic Spline Interpolation

Given a set of data points, cubic spline interpolation fits a smooth curve through these points. The curve is represented as a series of cubic polynomials between each pair of data points. Each polynomial ensures a smooth curve at the data points (i.e., the first and second derivatives are continuous).

{% code lineNumbers="true" %}

```python
with aisdb.SQLiteDBConn(dbpath=dbpath) as dbconn:
    qry = aisdb.DBQuery(
        dbconn=dbconn, start=start_time, end=end_time, mmsi = MMSI,
        callback=aisdb.database.sqlfcn_callbacks.in_timerange_hasmmsi,
    )
    rowgen = qry.gen_qry()
    tracks = aisdb.track_gen.TrackGen(rowgen, decimate=False)

    tracks__ = aisdb.interp.interp_cubic_spline(tracks, timedelta(minutes=10))

    # Visualizing the tracks
    df = track2dataframe(tracks__)
    plotly_visualize(df)
```

{% endcode %}

<figure><img src="/files/LDh8zs3KOakZ6r75dQqX" alt="" width="460"><figcaption><p>Cubic spline interpolation with equal time intervals</p></figcaption></figure>

## Custom Track Interpolation <a href="#custom-track-interpolation-barycentric-interpolation" id="custom-track-interpolation-barycentric-interpolation"></a>

In addition to the standard interpolation methods provided by **AISdb**, users can implement other interpolation techniques tailored to their specific analytical needs. For instance, B-spline (Basis Spline) interpolation is a mathematical technique that creates a smooth curve through data points. This smoothness is important in trajectory analysis as it avoids sharp, unrealistic turns and maintains a natural flow.

Here is an implementation and example of using B-spline interpolation:

{% code title="custom\_interpolation.py" lineNumbers="true" %}

```python
import warnings

import numpy as np
from scipy.interpolate import splrep, splev

def bspline_interpolation(track, key, intervals):
    """
    Perform B-Spline interpolation for a specific key on the track data.

    Parameters:
    - track: Dictionary containing vessel track data (time, lat, lon, etc.).
    - key: The dynamic key (e.g., 'lat', 'lon') for which interpolation is performed.
    - intervals: The equal time or distance intervals at which interpolation is required.

    Returns:
    - Interpolated values for the specified key.
    """
    # Get time and the key values (e.g., lat/lon) for interpolation
    times = track['time']
    values = track[key]

    # Create the B-Spline representation of the curve
    tck = splrep(times, values, s=0)  # s=0 means no smoothing, exact fit to data

    # Interpolate the values at the given intervals
    interpolated_values = splev(intervals, tck)

    return interpolated_values

def interp_bspline(tracks, step=1000):
    """
    Perform B-Spline interpolation on vessel trajectory data at equal time intervals.

    Parameters:
    - tracks: List of vessel track dictionaries.
    - step: Step for interpolation (can be time or distance-based).

    Yields:
    - Dictionary containing interpolated lat and lon values for each track.
    """
    for track in tracks:
        if len(track['time']) <= 1:
            warnings.warn('Cannot interpolate track of length 1, skipping...')
            continue

        # Generate equal time intervals based on the first and last time points
        intervals = np.arange(track['time'][0], track['time'][-1], step)

        # Perform B-Spline interpolation for lat and lon
        interpolated_lat = bspline_interpolation(track, 'lat', intervals)
        interpolated_lon = bspline_interpolation(track, 'lon', intervals)

        # Yield interpolated track
        itr = dict(
            mmsi=track['mmsi'],
            lat=interpolated_lat,
            lon=interpolated_lon,
            time=intervals  # Including interpolated time intervals for reference
        )
        yield itr
```

{% endcode %}

Then, we can apply the function we just implemented to the vessel track generator:

{% code lineNumbers="true" %}

```python
with aisdb.SQLiteDBConn(dbpath=dbpath) as dbconn:
    qry = aisdb.DBQuery(
        dbconn=dbconn, start=start_time, end=end_time, mmsi = MMSI,
        callback=aisdb.database.sqlfcn_callbacks.in_timerange_hasmmsi,
    )
    rowgen = qry.gen_qry()
    tracks = aisdb.track_gen.TrackGen(rowgen, decimate=False)

    tracks__ = interp_bspline(tracks)

    # Visualizing the tracks
    df = track2dataframe(tracks__)
    plotly_visualize(df)
```

{% endcode %}

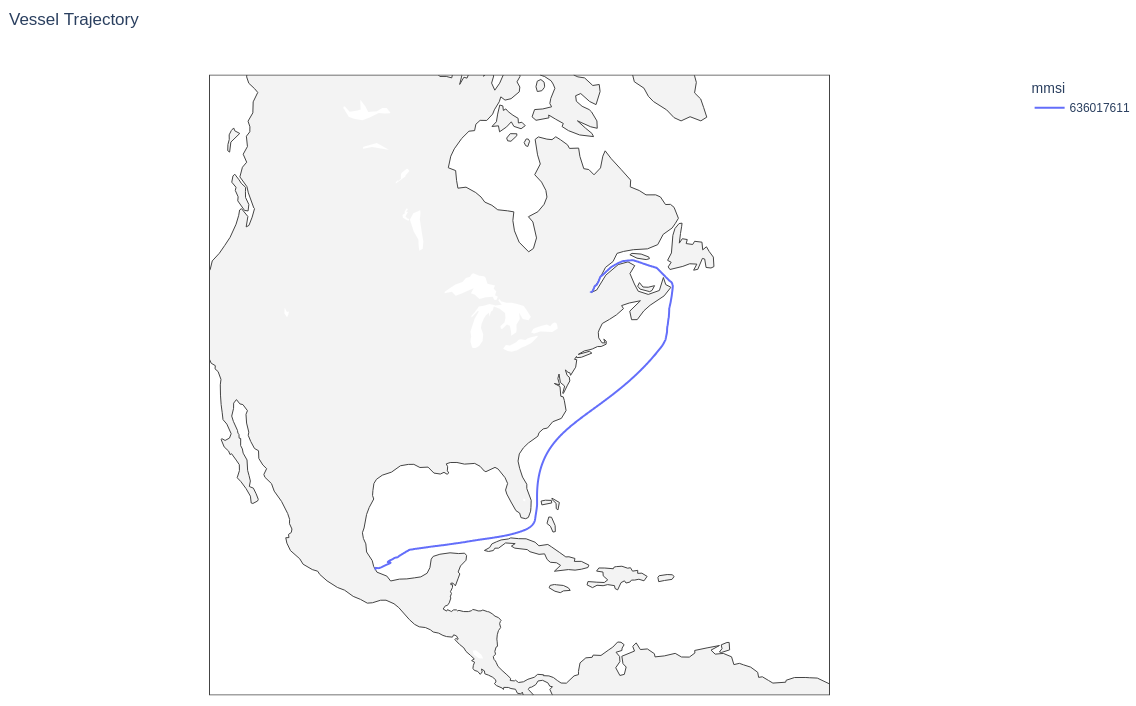
The visualization of the interpolation is shown below.

<figure><img src="/files/FqxhHZibBRrPyJ3zCkV3" alt=""><figcaption><p>B-spline interpolation with equal time intervals of 1,000 seconds</p></figcaption></figure>
## Choosing a method

Linear interpolation is the right default when speed matters more than geometric precision; it is cheap to compute and good enough for short gaps. For long ocean legs where a straight line would cut across the curvature of the Earth, geodesic interpolation follows the great-circle route instead. Cubic spline interpolation is worth reaching for when the downstream analysis is sensitive to smoothness, such as estimating heading or turn rate, since it avoids the sharp kinks a linear fit produces at each waypoint.

Whichever method is chosen, interpolation invents positions between what the receiver actually reported. Feeding it a noisy or duplicated track will smooth over errors rather than correct them, so denoise the track first.

## Where to go next

See [Data Cleaning](/documentation/tutorials/data-cleaning.md) for removing bad pings and duplicate reports before interpolating a track.


---

# Agent Instructions
This documentation is published with GitBook. GitBook is the documentation platform designed so that both humans and AI agents can read, navigate, and reason over technical content effectively. Learn more at gitbook.com.

## Querying This Documentation
If you need additional information that is not directly available in this page, you can query the documentation dynamically by asking a question.

Perform an HTTP GET request on the current page URL with the `ask` query parameter, and the optional `goal` query parameter:

```
GET https://aisviz.gitbook.io/documentation/tutorials/track-interpolation.md?ask=<question>&goal=<endgoal>
```

`ask` is the immediate question: it should be specific, self-contained, and written in natural language.
`goal` is optional and describes the broader end goal you are ultimately trying to accomplish on behalf of the user. GitBook uses it to tailor the answer towards what is most useful for that goal.

The response will contain a direct answer to the question and relevant excerpts and sources from the documentation.

Use this mechanism when the answer is not explicitly present in the current page, you need clarification or additional context, or you want to retrieve related documentation sections.