> For the complete documentation index, see [llms.txt](https://aisviz.gitbook.io/documentation/llms.txt). Markdown versions of documentation pages are available by appending `.md` to page URLs; this page is available as [Markdown](https://aisviz.gitbook.io/documentation/tutorials/data-visualization.md).

# Data Visualization

This tutorial covers the visualization options available for vessel trajectories processed with **AISdb**, including <mark style="background-color:yellow;">AISdb's integrated web interface</mark> and <mark style="background-color:yellow;">alternative approaches built on popular Python visualization packages</mark>. Each tool comes with a working example, so you can see exactly how to turn queried AISdb tracks into a map.

## Internal visualization

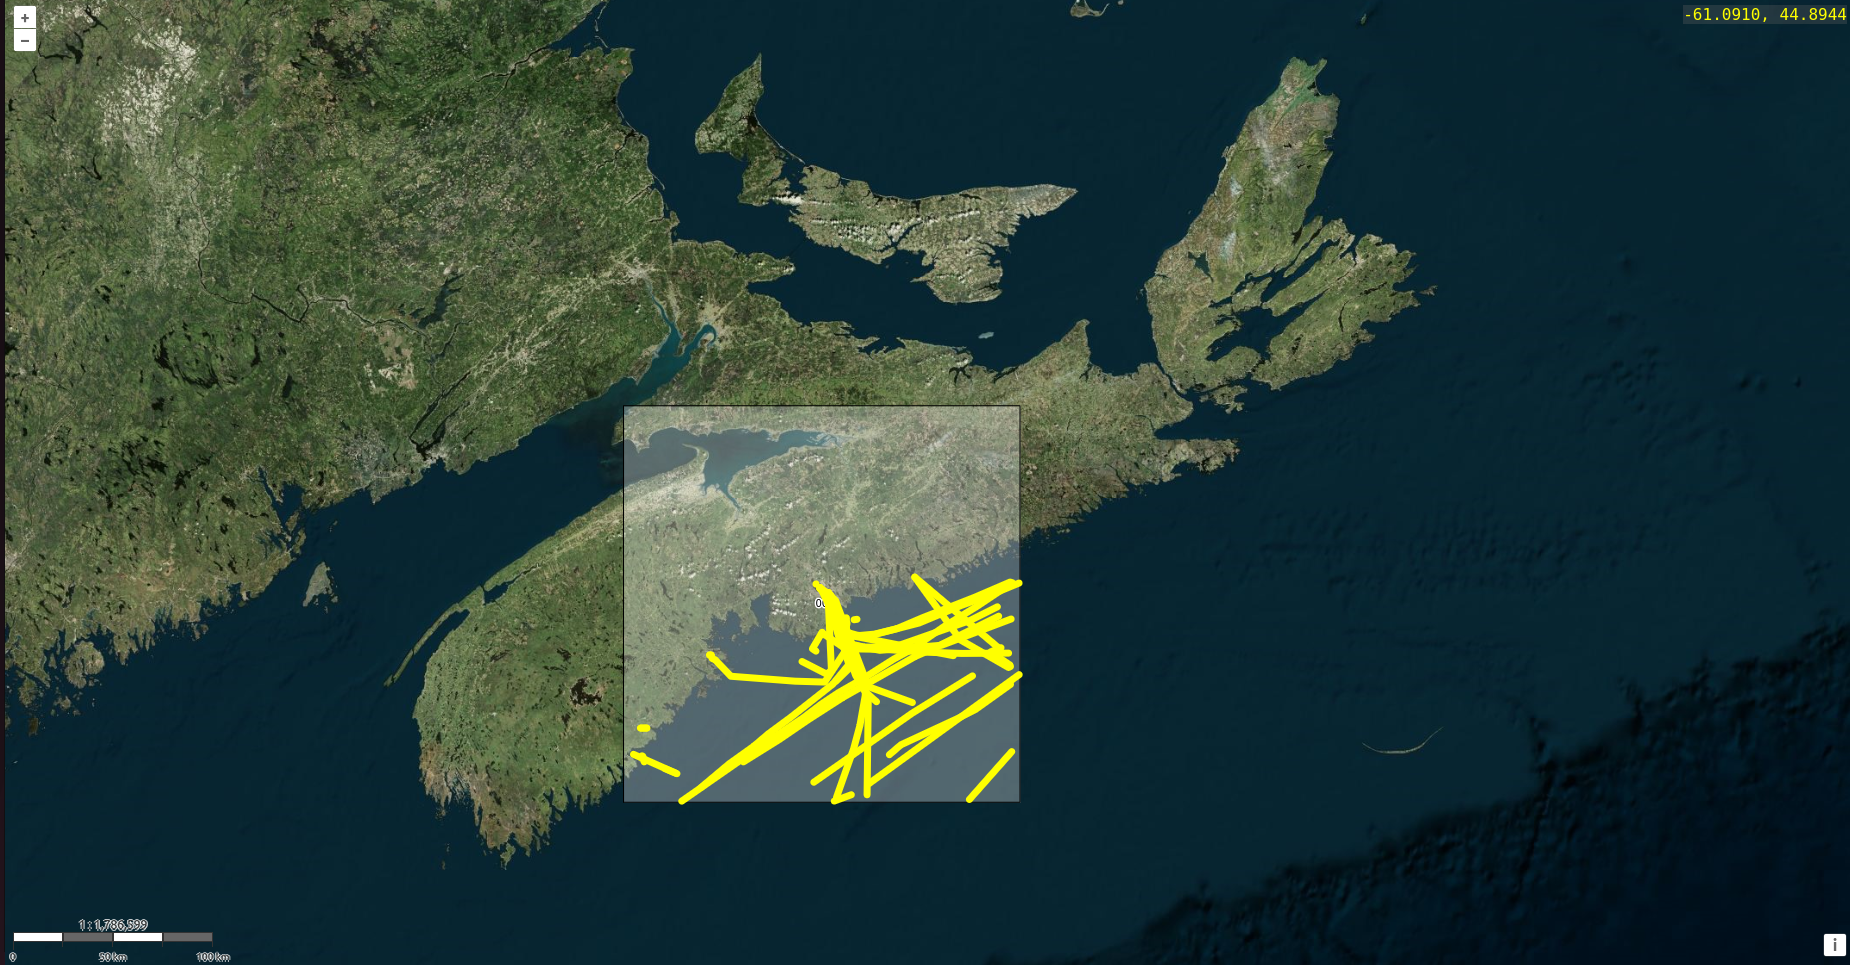
**AISdb** provides an integrated data visualization feature through the [`aisdb.web_interface.visualize`](https://aisviz.cs.dal.ca/AISdb/api/aisdb.web_interface.html#aisdb.web_interface.visualize) module, which allows users to generate interactive maps displaying vessel tracks. This built-in tool is designed for simplicity and ease of use, offering customizable visualizations directly from AIS data without requiring extensive setup.

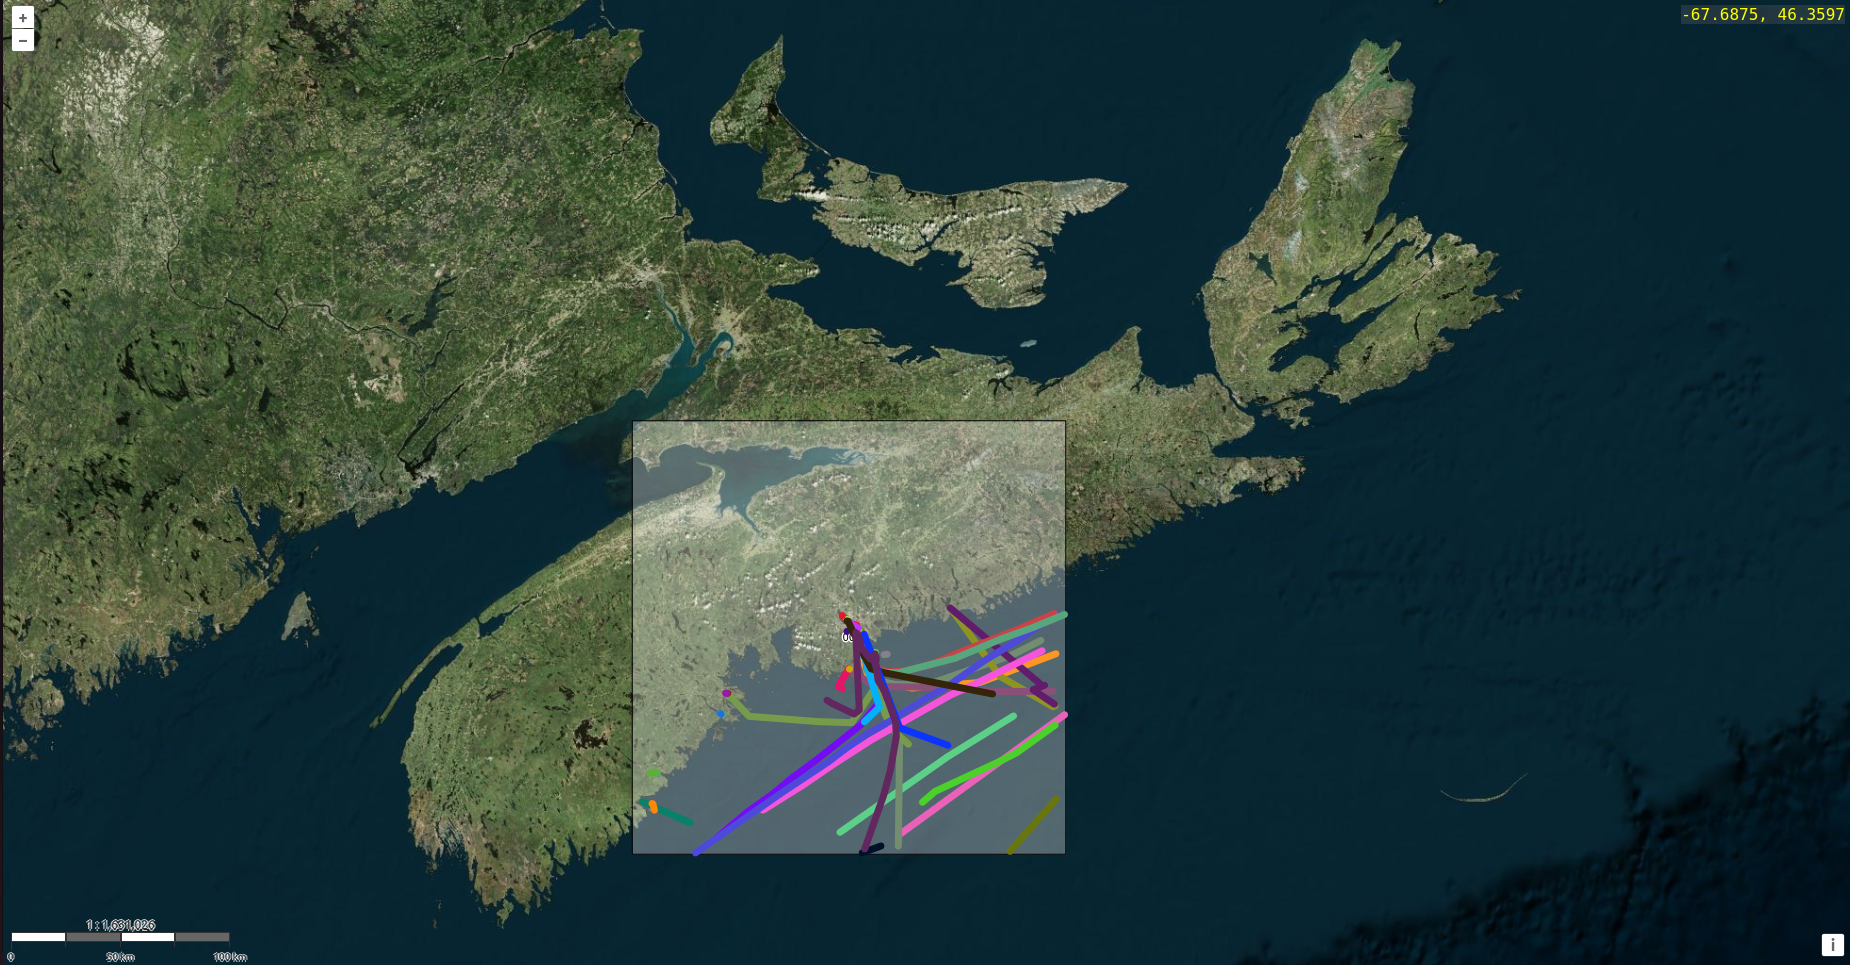
Here is an example of using the web interface module to show queried data with colors. To display vessel tracks in a single color:

{% code lineNumbers="true" %}

```python
import aisdb
from datetime import datetime
from aisdb.database.dbconn import SQLiteDBConn
from aisdb import DBConn, DBQuery, DomainFromPoints

import nest_asyncio
nest_asyncio.apply()

dbpath='YOUR_DATABASE.db' # Define the path to your database

# Set the start and end times for the query
start_time = datetime.strptime("2018-01-01 00:00:00", '%Y-%m-%d %H:%M:%S')
end_time = datetime.strptime("2018-01-03 00:00:00", '%Y-%m-%d %H:%M:%S')

# Define a circle with a 100km radius around the location point
domain = DomainFromPoints(points=[(-63.6, 44.6)], radial_distances=[100000]) 

def color_tracks(tracks):
    """ Set the color of each vessel track using a color name or RGB value. """
    for track in tracks:
        track['color'] = 'yellow'
        yield track

with aisdb.SQLiteDBConn(dbpath=dbpath) as dbconn:
    qry = aisdb.DBQuery(
        dbconn=dbconn, start=start_time, end=end_time,
        xmin=domain.boundary['xmin'], xmax=domain.boundary['xmax'],
        ymin=domain.boundary['ymin'], ymax=domain.boundary['ymax'],
        callback=aisdb.database.sqlfcn_callbacks.in_time_bbox_validmmsi,
    )
    rowgen = qry.gen_qry()
    
    tracks = aisdb.track_gen.TrackGen(rowgen, decimate=False)
    colored_tracks = color_tracks(tracks)

    # Visualization
    aisdb.web_interface.visualize(
        colored_tracks,
        domain=domain,
        visualearth=True,
        open_browser=True,
    )
```

{% endcode %}

<figure><img src="/files/owwZelIfs40sXhYwhNgI" alt=""><figcaption><p>Visualizing queried vessel tracks in a single color</p></figcaption></figure>

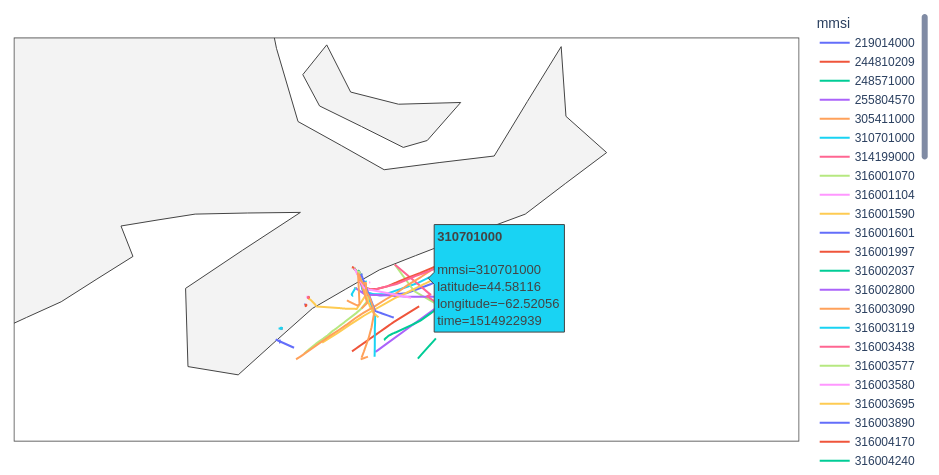
If you want to visualize vessel tracks in different colors based on MMSI, here's an example that demonstrates how to color-code tracks for easy identification:

{% code lineNumbers="true" %}

```python
import random

def color_tracks2(tracks):
    colors = {}
    for track in tracks:
        mmsi = track.get('mmsi')
        if mmsi not in colors:
            # Assign a random color to this MMSI if not already assigned
            colors[mmsi] = "#{:06x}".format(random.randint(0, 0xFFFFFF))
            track['color'] = colors[mmsi] # Set the color for the current track
        yield track


with aisdb.SQLiteDBConn(dbpath=dbpath) as dbconn:
    qry = aisdb.DBQuery(
        dbconn=dbconn, start=start_time, end=end_time,
        xmin=domain.boundary['xmin'], xmax=domain.boundary['xmax'],
        ymin=domain.boundary['ymin'], ymax=domain.boundary['ymax'],
        callback=aisdb.database.sqlfcn_callbacks.in_time_bbox_validmmsi,
    )
    rowgen = qry.gen_qry()
    
    tracks = aisdb.track_gen.TrackGen(rowgen, decimate=False)
    colored_tracks = list(color_tracks2(tracks))

    # Visualization
    aisdb.web_interface.visualize(
        colored_tracks,
        domain=domain,
        visualearth=True,
        open_browser=True,
    )
```

{% endcode %}

<figure><img src="/files/my5oB0PuHuJzEHKF9Ta3" alt=""><figcaption><p>Visualizing vessel tracks in multiple colors based on MMSIs</p></figcaption></figure>

## Alternative visualization

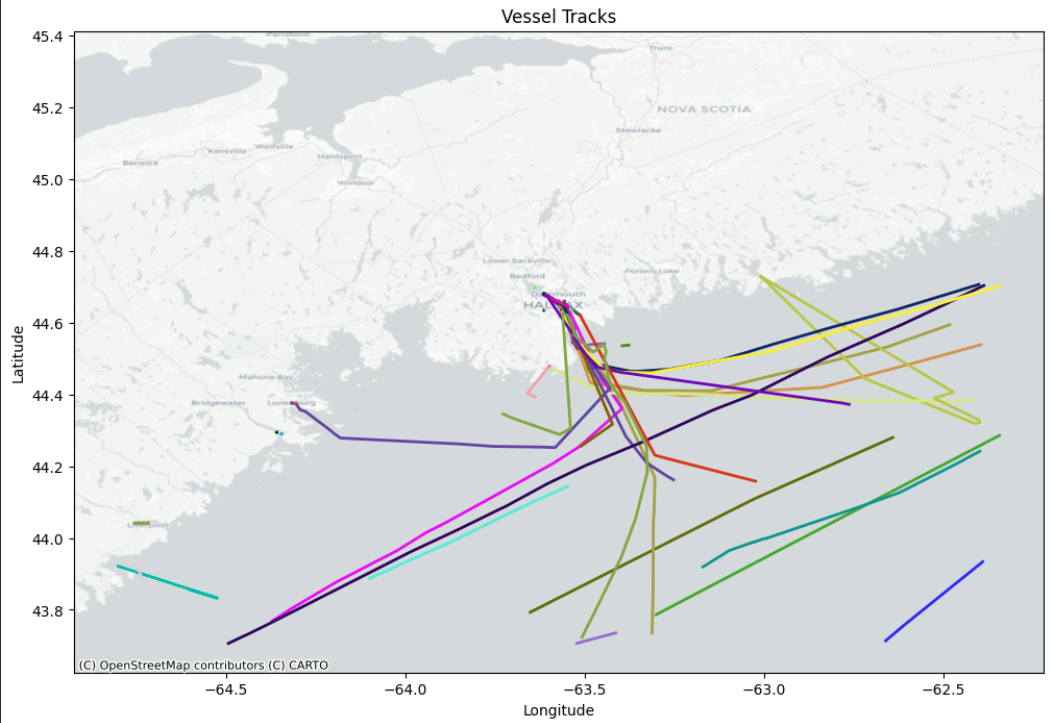
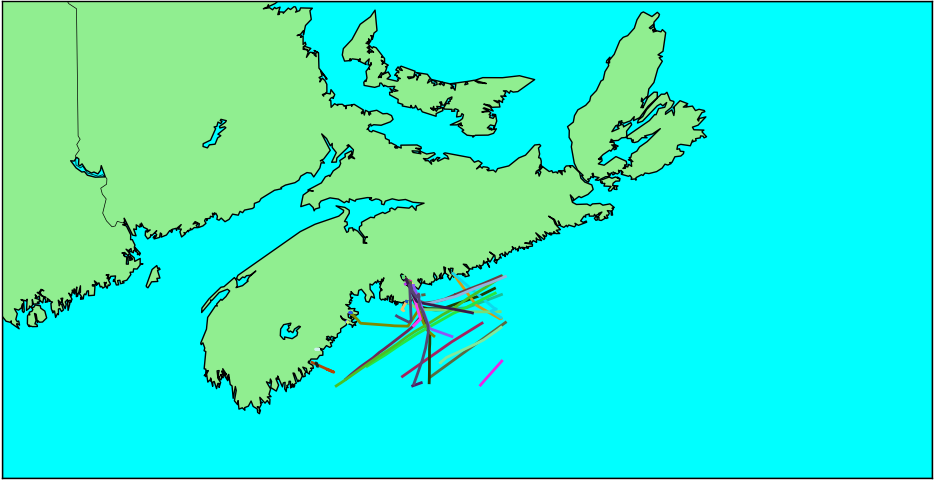
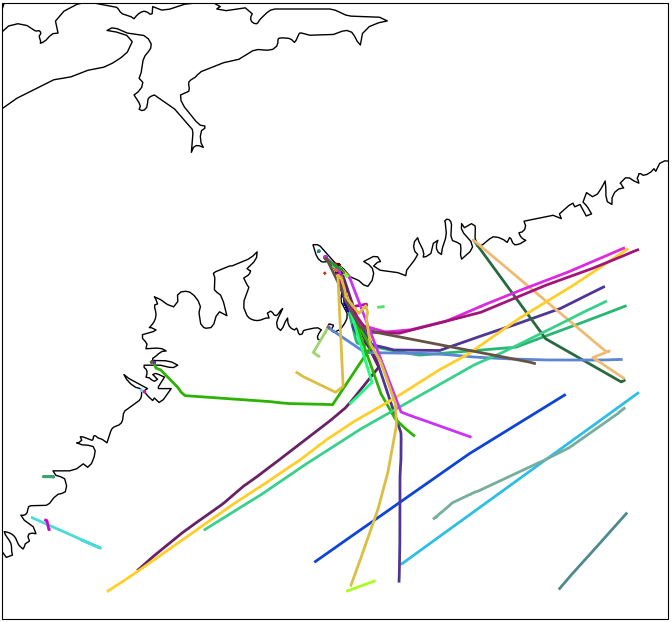
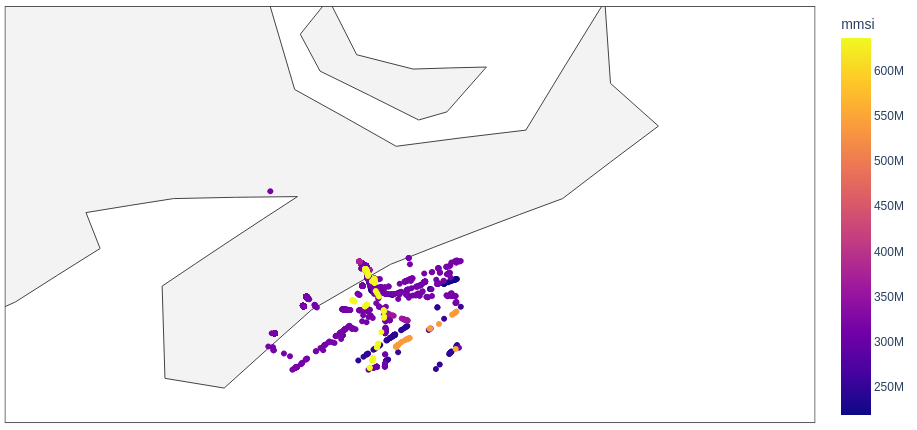
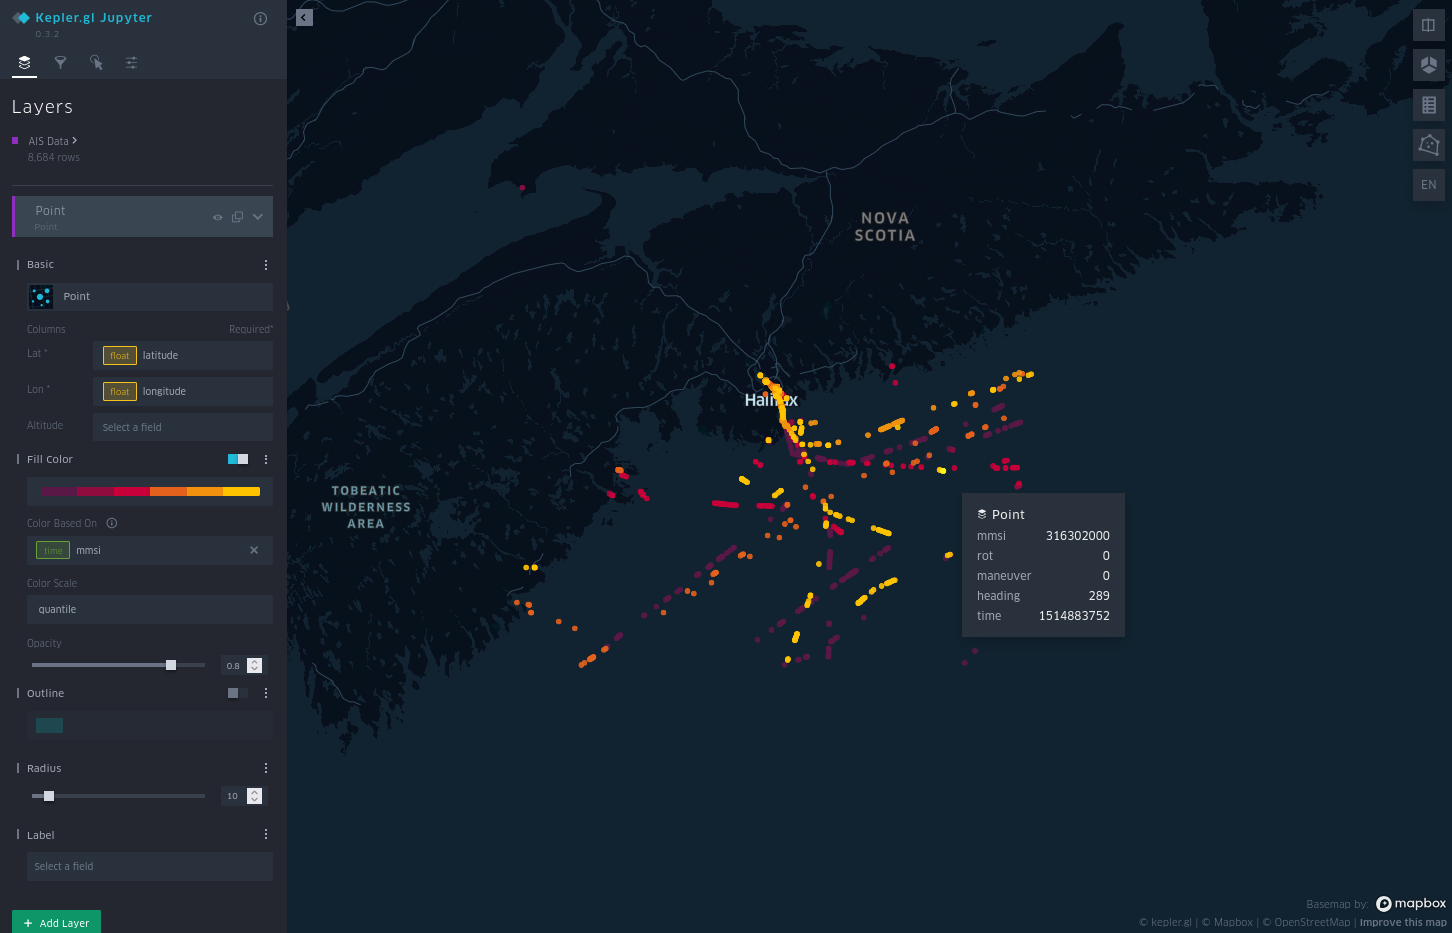
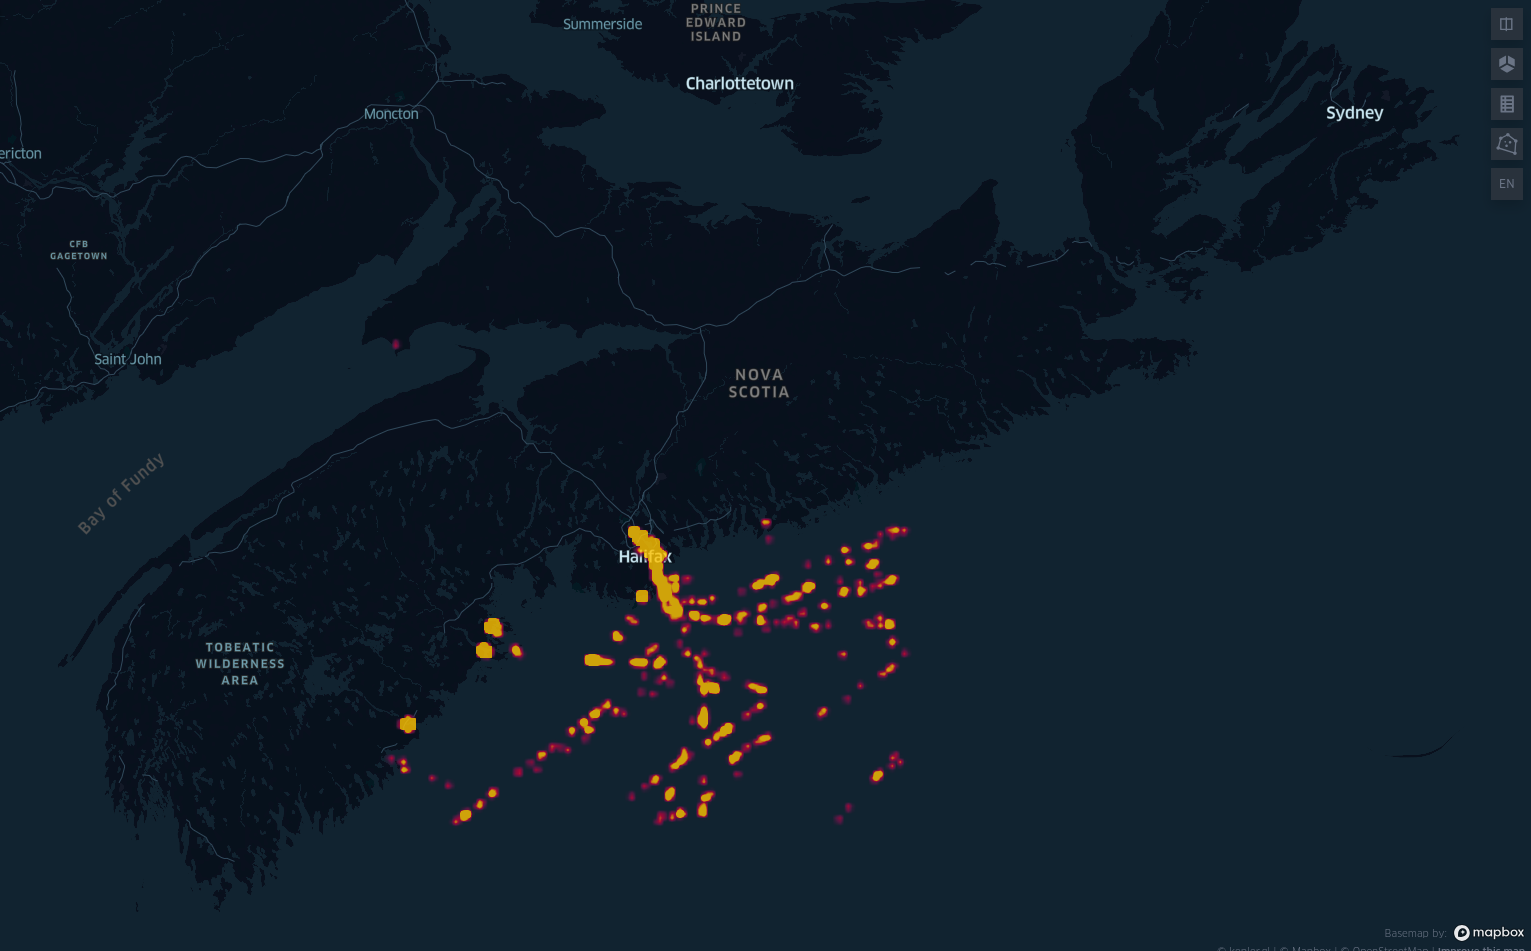
If you need more advanced or specialized visualization, several Python packages pair well with AISdb tracks. Contextily, `Basemap`, and `Cartopy` are solid choices for detailed 2D plots, while `Plotly` gives you interactive, web-based graphs. `Kepler.gl` is the better fit for large-scale or 3D visualizations. Each package handles the same track data differently, so pick whichever fits how you want to present and explore your AIS data.

### Contextily + Matplotlib

{% code title="contextily.py" lineNumbers="true" %}

```python
import aisdb
from datetime import datetime
from aisdb.database.dbconn import SQLiteDBConn
from aisdb import DBConn, DBQuery, DomainFromPoints
import contextily as cx
import matplotlib.pyplot as plt
import random 
import nest_asyncio
nest_asyncio.apply()

dbpath='YOUR_DATABASE.db' # Define the path to your database

# Set the start and end times for the query
start_time = datetime.strptime("2018-01-01 00:00:00", '%Y-%m-%d %H:%M:%S')
end_time = datetime.strptime("2018-01-03 00:00:00", '%Y-%m-%d %H:%M:%S')

# Define a circle with a 100km radius around the location point
domain = DomainFromPoints(points=[(-63.6, 44.6)], radial_distances=[100000])
 
def color_tracks2(tracks):
    colors = {}
    for track in tracks:
        mmsi = track.get('mmsi')
        if mmsi not in colors:
            # Assign a random color to this MMSI if not already assigned
            colors[mmsi] = "#{:06x}".format(random.randint(0, 0xFFFFFF))
            track['color'] = colors[mmsi] # Set the color for the current track
        yield track

def plot_tracks_with_contextily(tracks):
    plt.figure(figsize=(12, 8))

    for track in tracks:
        plt.plot(track['lon'], track['lat'], color=track['color'], linewidth=2)

    # Add basemap
    cx.add_basemap(plt.gca(), crs='EPSG:4326', source=cx.providers.CartoDB.Positron)

    plt.xlabel('Longitude')
    plt.ylabel('Latitude')
    plt.title('Vessel Tracks with Basemap')
    plt.show()
    

with aisdb.SQLiteDBConn(dbpath=dbpath) as dbconn:
    qry = aisdb.DBQuery(
        dbconn=dbconn, start=start_time, end=end_time,
        xmin=domain.boundary['xmin'], xmax=domain.boundary['xmax'],
        ymin=domain.boundary['ymin'], ymax=domain.boundary['ymax'],
        callback=aisdb.database.sqlfcn_callbacks.in_time_bbox_validmmsi,
    )
    rowgen = qry.gen_qry()
    
    tracks = aisdb.track_gen.TrackGen(rowgen, decimate=False)
    colored_tracks = list(color_tracks2(tracks))
    
    plot_tracks_with_contextily(colored_tracks)
```

{% endcode %}

<figure><img src="/files/tPqmwIhJA2SvVa1xDQlG" alt="" width="563"><figcaption><p>Visualization of vessel tracks with Contextily</p></figcaption></figure>

### :warning: Basemap + Matplotlib

> Note: mpl\_toolkits.basemap uses numpy v1, so downgrade numpy to v1.26.4 to use Basemap, or turn to one of the other alternatives mentioned here, such as Contextily.

{% code title="basemap.py" lineNumbers="true" %}

```python
from mpl_toolkits.basemap import Basemap
import matplotlib.pyplot as plt

def plot_tracks_with_basemap(tracks):
    plt.figure(figsize=(12, 8))
    # Define the geofence boundaries
    llcrnrlat = 42.854329883666175  # Latitude of the southwest corner
    urcrnrlat = 47.13666808816243   # Latitude of the northeast corner
    llcrnrlon = -68.73998377599209  # Longitude of the southwest corner
    urcrnrlon = -56.92378296577808  # Longitude of the northeast corner

    # Create the Basemap object with the geofence
    m = Basemap(projection='merc', 
                llcrnrlat=llcrnrlat, urcrnrlat=urcrnrlat,
                llcrnrlon=llcrnrlon, urcrnrlon=urcrnrlon, resolution='i')
    
    m.drawcoastlines()
    m.drawcountries()
    m.drawmapboundary(fill_color='aqua')
    m.fillcontinents(color='lightgreen', lake_color='aqua')

    for track in tracks:
        lons, lats = track['lon'], track['lat']
        x, y = m(lons, lats)
        m.plot(x, y, color=track['color'], linewidth=2)

    plt.show()
    
with aisdb.SQLiteDBConn(dbpath=dbpath) as dbconn:
    qry = aisdb.DBQuery(
        dbconn=dbconn, start=start_time, end=end_time,
        xmin=domain.boundary['xmin'], xmax=domain.boundary['xmax'],
        ymin=domain.boundary['ymin'], ymax=domain.boundary['ymax'],
        callback=aisdb.database.sqlfcn_callbacks.in_time_bbox_validmmsi,
    )
    rowgen = qry.gen_qry()
    
    tracks = aisdb.track_gen.TrackGen(rowgen, decimate=False)
    colored_tracks = list(color_tracks2(tracks))
    
    plot_tracks_with_basemap(colored_tracks)
```

{% endcode %}

<figure><img src="/files/ckWAhQ3apbqkMx1qR80j" alt=""><figcaption><p>Visualization of vessel tracks with Basemap</p></figcaption></figure>

### Cartopy

{% code title="cartopy.py" lineNumbers="true" %}

```python
import cartopy.crs as ccrs
import matplotlib.pyplot as plt

def plot_tracks_with_cartopy(tracks):
    plt.figure(figsize=(12, 8))
    ax = plt.axes(projection=ccrs.Mercator())
    ax.coastlines()
    
    for track in tracks:
        lons, lats = track['lon'], track['lat']
        ax.plot(lons, lats, transform=ccrs.PlateCarree(), color=track['color'], linewidth=2)
    
    plt.title('AIS Tracks Visualization with Cartopy')
    plt.show()

with aisdb.SQLiteDBConn(dbpath=dbpath) as dbconn:
    qry = aisdb.DBQuery(
        dbconn=dbconn, start=start_time, end=end_time,
        xmin=domain.boundary['xmin'], xmax=domain.boundary['xmax'],
        ymin=domain.boundary['ymin'], ymax=domain.boundary['ymax'],
        callback=aisdb.database.sqlfcn_callbacks.in_time_bbox_validmmsi,
    )
    rowgen = qry.gen_qry()
    
    tracks = aisdb.track_gen.TrackGen(rowgen, decimate=False)
    colored_tracks = list(color_tracks2(tracks))
    
    plot_tracks_with_cartopy(colored_tracks)
```

{% endcode %}

<figure><img src="/files/W307iwaj8H0yaymZJWGb" alt="" width="504"><figcaption><p>Visualization of vessel tracks with Cartopy</p></figcaption></figure>

### Plotly

{% code title="plotly.py" lineNumbers="true" %}

```python
import plotly.graph_objects as go
import plotly.express as px
import pandas as pd

def track2dataframe(tracks):
    data = []
    # Iterate over each track in the vessels_generator
    for track in tracks:
        # Unpack static information
        mmsi = track['mmsi']
        rot = track['rot']
        maneuver = track['maneuver']
        heading = track['heading']
    
        # Unpack dynamic information
        times = track['time']
        lons = track['lon']
        lats = track['lat']
        cogs = track['cog']
        sogs = track['sog']
        utc_seconds = track['utc_second']
    
        # Iterate over the dynamic arrays and create a row for each time point
        for i in range(len(times)):
            data.append({
                'mmsi': mmsi,
                'rot': rot,
                'maneuver': maneuver,
                'heading': heading,
                'time': times[i],
                'longitude': lons[i],
                'latitude': lats[i],
                'cog': cogs[i],
                'sog': sogs[i],
                'utc_second': utc_seconds[i],
            })
            
    # Convert the list of dictionaries to a pandas DataFrame
    df = pd.DataFrame(data)
    
    return df

def plotly_visualize(data, visual_type='lines'):
    if (visual_type=='scatter'):
        # Create a scatter plot for the vessel data points using scatter_geo
        fig = px.scatter_geo(
            data,
            lat="latitude",
            lon="longitude",
            color="mmsi",  # Color by vessel identifier
            hover_name="mmsi",
            hover_data={"time": True},
            title="Vessel Data Points"
        )
    else:
        # Create a line plot for the vessel trajectory using scatter_geo
        fig = px.line_geo(
            data,
            lat="latitude",
            lon="longitude",
            color="mmsi",  # Color by vessel identifier
            hover_name="mmsi",
            hover_data={"time": True},
        )
    
    # Set the map style and projection
    fig.update_geos(
        projection_type="azimuthal equal area",  # Change this to 'natural earth', 'azimuthal equal area', etc.
        showland=True,
        landcolor="rgb(243, 243, 243)",
        countrycolor="rgb(204, 204, 204)",
        lonaxis=dict(range=[-68.73998377599209, -56.92378296577808]),  # Longitude range (geofence)
        lataxis=dict(range=[42.854329883666175, 47.13666808816243])   # Latitude range (geofence)
    )
    
    # Set the layout to focus on a specific area or zoom level
    fig.update_layout(
        geo=dict(
            projection_type="mercator",
            center={"lat": 44.5, "lon": -63.5},
        ),
        width=900,  # Increase the width of the plot
        height=700,  # Increase the height of the plot
    ) 
    fig.show()

with aisdb.SQLiteDBConn(dbpath=dbpath) as dbconn:
    qry = aisdb.DBQuery(
        dbconn=dbconn, start=start_time, end=end_time,
        xmin=domain.boundary['xmin'], xmax=domain.boundary['xmax'],
        ymin=domain.boundary['ymin'], ymax=domain.boundary['ymax'],
        callback=aisdb.database.sqlfcn_callbacks.in_time_bbox_validmmsi,
    )
    rowgen = qry.gen_qry()
    tracks = aisdb.track_gen.TrackGen(rowgen, decimate=False)

    df = track2dataframe(tracks)
    plotly_visualize(df, 'lines')
```

{% endcode %}

<figure><img src="/files/IVS1b4IBIcBwsa8FKSSe" alt=""><figcaption><p>Interactive visualization of vessel tracks with Plotly</p></figcaption></figure>

<figure><img src="/files/yERElYPtO5TxOQOV0d2D" alt=""><figcaption><p>Interactive visualization of vessel positions with Plotly</p></figcaption></figure>

### Kepler.gl

{% code title="kepler.py" lineNumbers="true" %}

```python
import pandas as pd
from keplergl import KeplerGl

def visualize_with_kepler(data, config=None):
    map_1 = KeplerGl(height=600)
    map_1.add_data(data=data, name="AIS Data")
    map_1.save_to_html(file_name='./figure/kepler_map.html')
    
    return map_1

with aisdb.SQLiteDBConn(dbpath=dbpath) as dbconn:
    qry = aisdb.DBQuery(
        dbconn=dbconn, start=start_time, end=end_time,
        xmin=domain.boundary['xmin'], xmax=domain.boundary['xmax'],
        ymin=domain.boundary['ymin'], ymax=domain.boundary['ymax'],
        callback=aisdb.database.sqlfcn_callbacks.in_time_bbox_validmmsi,
    )
    rowgen = qry.gen_qry()
    tracks = aisdb.track_gen.TrackGen(rowgen, decimate=False)
    
    df = track2dataframe(tracks)
    map_1 = visualize_with_kepler(df)
```

{% endcode %}

<figure><img src="/files/FwxdHWFKCqhFUZ68NtXe" alt=""><figcaption><p>Interactive visualization of vessel track positions with Kepler.gl</p></figcaption></figure>

<figure><img src="/files/Vydr4tg79B9m2lufGi59" alt=""><figcaption><p>Heat map of vessel track density with Kepler.gl</p></figcaption></figure>

## Where to go next

Which tool to reach for depends on what you're checking. `web_interface.visualize` is the fastest way to eyeball a query while you're still iterating on it, since it needs no extra dependencies beyond AISdb itself. Matplotlib with Contextily or Cartopy is the right choice once you need a static figure for a report or paper, where projection control and print quality matter more than interactivity. Kepler.gl is built for the opposite case, large track sets that need to be filtered, layered, and explored interactively rather than viewed once and discarded.

Once tracks are visualized, [tutorials/track-interpolation.md](/documentation/tutorials/track-interpolation.md) covers filling gaps between AIS position reports so the tracks you plot are continuous rather than jumping between sparse pings.


---

# Agent Instructions
This documentation is published with GitBook. GitBook is the documentation platform designed so that both humans and AI agents can read, navigate, and reason over technical content effectively. Learn more at gitbook.com.

## Querying This Documentation
If you need additional information that is not directly available in this page, you can query the documentation dynamically by asking a question.

Perform an HTTP GET request on the current page URL with the `ask` query parameter, and the optional `goal` query parameter:

```
GET https://aisviz.gitbook.io/documentation/tutorials/data-visualization.md?ask=<question>&goal=<endgoal>
```

`ask` is the immediate question: it should be specific, self-contained, and written in natural language.
`goal` is optional and describes the broader end goal you are ultimately trying to accomplish on behalf of the user. GitBook uses it to tailor the answer towards what is most useful for that goal.

The response will contain a direct answer to the question and relevant excerpts and sources from the documentation.

Use this mechanism when the answer is not explicitly present in the current page, you need clarification or additional context, or you want to retrieve related documentation sections.