> For the complete documentation index, see [llms.txt](https://aisviz.gitbook.io/documentation/llms.txt). Markdown versions of documentation pages are available by appending `.md` to page URLs; this page is available as [Markdown](https://aisviz.gitbook.io/documentation/tutorials/bathymetric-data.md).
# Bathymetric Data
Merge GEBCO global bathymetric grids onto AIS tracks with AISdb, then color and visualize vessel movement by the depth of water it traveled through.
## Process AIS data with Bathymetric Data
Vessel behavior often depends on what's beneath the hull as much as what's around it. A ship hugging the 20-meter contour is behaving very differently from one crossing open ocean, and that context is invisible in AIS data alone. AISdb closes that gap with [`aisdb.webdata.bathymetry.Gebco`](https://aisviz.cs.dal.ca/AISdb/api/aisdb.webdata.bathymetry.html), a class that fetches [GEBCO](https://www.gebco.net/) global bathymetric grids and merges depth values directly onto your track data.
In the example below, we find every vessel within a 500-kilometer radius of Halifax, Canada, on January 1, 2018, then color each track by the depth of water it traveled through.
{% stepper %}
{% step %}
#### Downloading the GEBCO bathymetry grid
`Gebco` wraps GEBCO's raster tiles behind a single interface. Give it a `data_dir` and it takes care of the rest, checking whether the tiles are already on disk and downloading them if not.
{% code lineNumbers="true" %}
```python
import os
import aisdb
from datetime import datetime
from aisdb import SQLiteDBConn, DBQuery, DomainFromPoints
from aisdb.webdata.bathymetry import Gebco
# set the path to the data storage directory
bathymetry_data_dir = "./bathymetry_data/"
os.makedirs(bathymetry_data_dir, exist_ok=True)
# opening Gebco as a context manager triggers the download if the
# raster tiles aren't already present in data_dir
with Gebco(data_dir=bathymetry_data_dir) as bathy:
print("Bathymetry rasters ready:", list(bathy.rasterfiles.keys()))
```
{% endcode %}
```
Bathymetry rasters ready: ['gebco_2022_n0.0_s-90.0_w0.0_e90.0.tif', 'gebco_2022_n90.0_s0.0_w-90.0_e0.0.tif']
```
Each key names the quadrant it covers, `gebco_2022_n_s_w_e.tif`, so the list above tells you exactly which 90-degree tiles landed on disk. Halifax sits in the northwestern quadrant, so only the second tile actually gets opened once you start merging tracks.
Be prepared for what that download involves. GEBCO's global bathymetry, split into regional GeoTIFF tiles by latitude and longitude, ships as two 7-Zip archives attached to the AISdb data release on GitHub, and together they exceed two gigabytes. The first time you point `Gebco` at an empty `data_dir`, expect a multi-minute download over a decent connection, followed by extraction with the system `7z` binary if it's installed, or with `py7zr` as a pure-Python fallback if it isn't. Once extraction finishes, the archives themselves are deleted and only the `.tif` tiles remain. After that first run, `Gebco` sees the tiles already on disk and skips the download entirely, so budget the wait once per machine, not once per script run.
{% endstep %}
{% step %}
#### Querying the AIS data
With the bathymetry grid staged, the next step is a normal AISdb query. We define a 500-kilometer domain around Halifax and pull every position report from that window.
{% code lineNumbers="true" %}
```python
dbpath = "YOUR_DATABASE.db" # path to your AISdb database
start_time = datetime.strptime("2018-01-01 00:00:00", "%Y-%m-%d %H:%M:%S")
end_time = datetime.strptime("2018-01-02 00:00:00", "%Y-%m-%d %H:%M:%S")
domain = DomainFromPoints(points=[(-63.6, 44.6)], radial_distances=[500000])
with SQLiteDBConn(dbpath=dbpath) as dbconn:
qry = DBQuery(
dbconn=dbconn, start=start_time, end=end_time,
xmin=domain.boundary["xmin"], xmax=domain.boundary["xmax"],
ymin=domain.boundary["ymin"], ymax=domain.boundary["ymax"],
callback=aisdb.database.sqlfcn_callbacks.in_time_bbox_validmmsi,
)
tracks = aisdb.track_gen.TrackGen(qry.gen_qry(), decimate=False)
```
{% endcode %}
{% endstep %}
{% step %}
#### Merging depth onto the tracks
`Gebco.merge_tracks` takes the track generator and, for every position, looks up which raster tile covers that coordinate, loading it on demand, then reads the depth value at that point. It appends a `depth_metres` column to each track and adds it to the track's `dynamic` field set, so it travels along with `lon`, `lat`, and `time`.
{% code lineNumbers="true" %}
```python
with Gebco(data_dir=bathymetry_data_dir) as bathy:
tracks_depth = list(bathy.merge_tracks(tracks))
```
{% endcode %}
Because a single track can cross more than one raster tile, `Gebco` keeps every tile it has touched open for the lifetime of the `with` block and closes them all on exit. That's also why the bathymetry lookup has to happen inside the same context manager the query and `TrackGen` are wrapped in, or shortly after, rather than being deferred to some later point in the script.
Once `merge_tracks` finishes, `depth_metres` holds one value per position report, aligned with `lon`, `lat`, and `time`. As the coloring section below explains, GEBCO reports depth as a positive number below sea level, so a track's array climbs from near zero at the shelf edge into the thousands over open ocean. A position that lands on a land pixel in the raster (a harbor entrance hugging the coast, for instance) can come back negative, since that's elevation above sea level rather than depth. Printing one track's array after the merge shows the shape to expect, with exact values depending on the vessel's actual route and the resolution of the underlying grid.
```
array([ -3.2, 14.6, 58.9, 210.5, 980.3, 1523.8])
```
{% endstep %}
{% step %}
#### Coloring the tracks by depth
Depth values from `Gebco` are returned in meters below sea level. We use that to bucket each track into a rough depth class and set a `color` field, which `aisdb.web_interface.visualize` reads directly.
{% code lineNumbers="true" %}
```python
def add_color(tracks):
for track in tracks:
# average depth across all positions in the track
avg_depth = sum(track["depth_metres"]) / len(track["depth_metres"])
if avg_depth <= 200:
track["color"] = "yellow" # continental shelf
elif avg_depth <= 2000:
track["color"] = "orange" # continental slope
elif avg_depth <= 6000:
track["color"] = "pink" # abyssal plain
else:
track["color"] = "red" # deep ocean trench
yield track
```
{% endcode %}
These bands loosely follow real ocean depth zones. The shelf around Nova Scotia rarely exceeds 200 meters, the slope drops off quickly beyond it, and abyssal depths in the North Atlantic run a few thousand meters deep before the rare trench pushes past 6,000.
{% endstep %}
{% step %}
#### Putting it together
{% code lineNumbers="true" %}
```python
tracks_colored = add_color(tracks_depth)
if __name__ == "__main__":
aisdb.web_interface.visualize(
tracks_colored,
domain=domain,
visualearth=True,
open_browser=True,
)
```
{% endcode %}
`visualize` starts a local web server and serves the colored tracks over a websocket, opening your default browser to view the result. Passing `domain=domain` draws the search boundary on the map alongside the tracks.
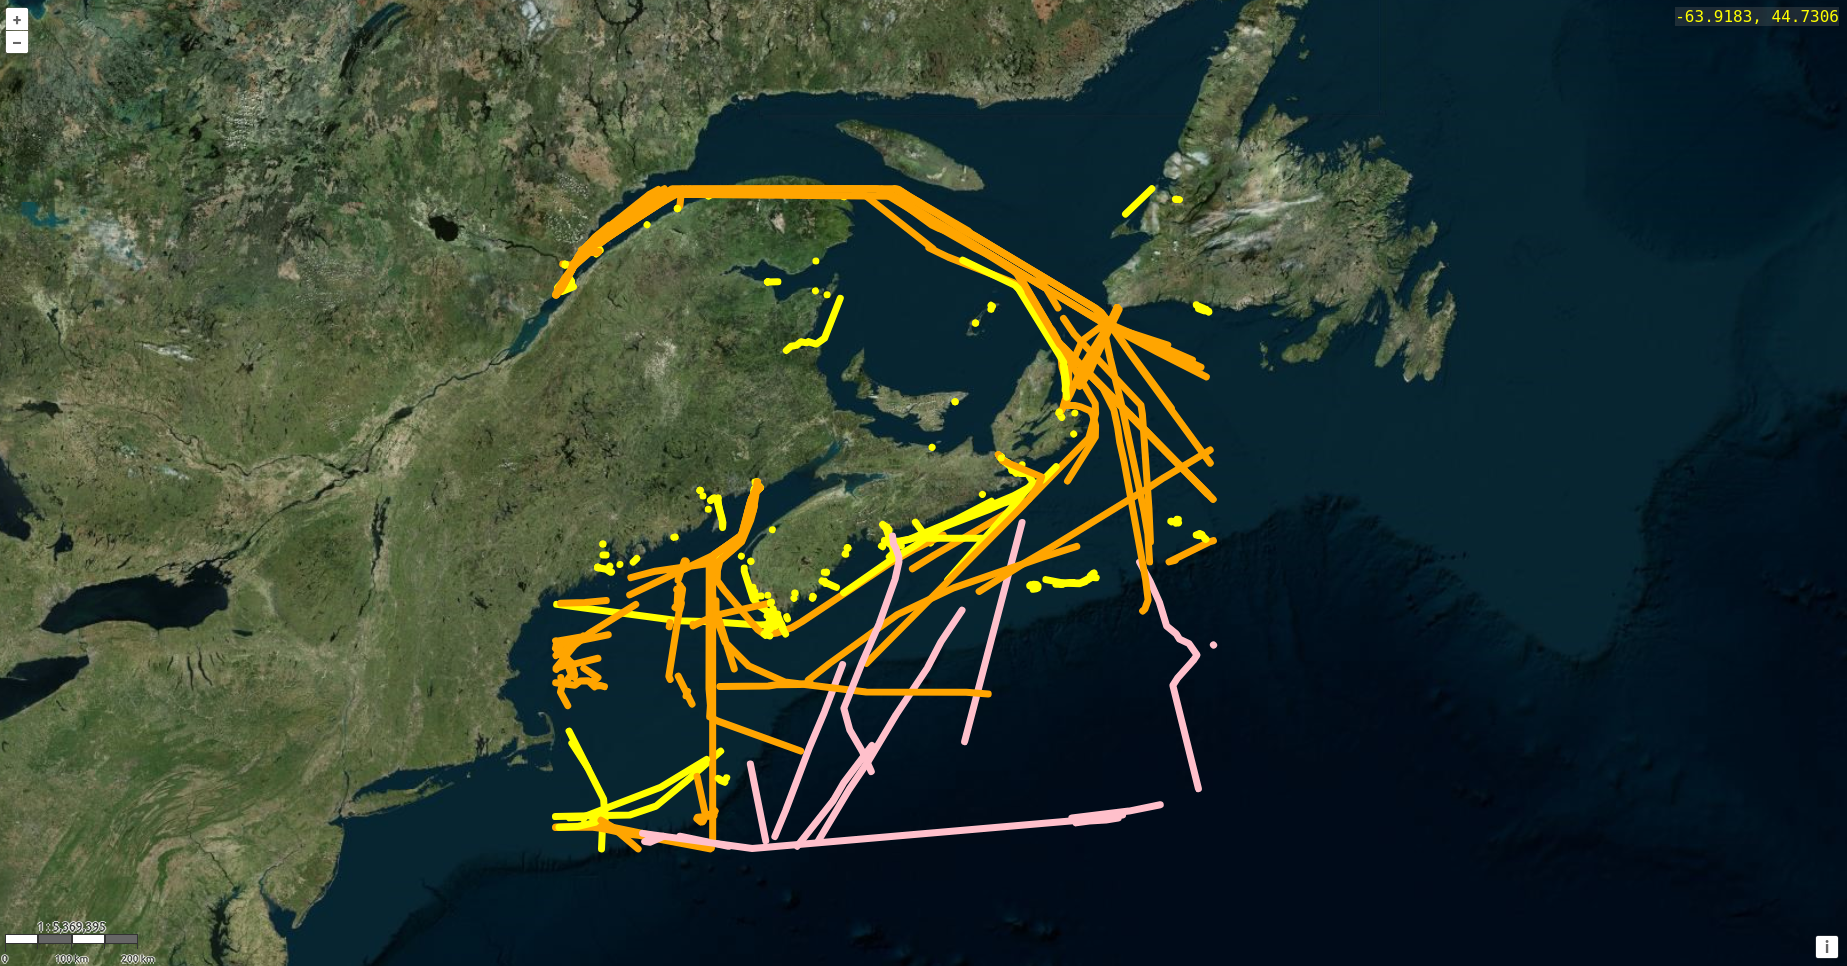
The integrated results are color-coded and can be visualized as shown below.
Vessel tracks colored with average depths relative to the bathymetry
* **Yellow** marks tracks with an average depth of 200 meters or less (continental shelf).
* **Orange** marks tracks with an average depth between 200 and 2,000 meters (continental slope).
* **Pink** marks tracks with an average depth between 2,000 and 6,000 meters (abyssal plain).
* **Red** marks tracks with an average depth greater than 6,000 meters (deep trenches).
{% endstep %}
{% endstepper %}
---
# Agent Instructions
This documentation is published with GitBook. GitBook is the documentation platform designed so that both humans and AI agents can read, navigate, and reason over technical content effectively. Learn more at gitbook.com.
## Querying This Documentation
If you need additional information that is not directly available in this page, you can query the documentation dynamically by asking a question.
Perform an HTTP GET request on the current page URL with the `ask` query parameter, and the optional `goal` query parameter:
```
GET https://aisviz.gitbook.io/documentation/tutorials/bathymetric-data.md?ask=&goal=
```
`ask` is the immediate question: it should be specific, self-contained, and written in natural language.
`goal` is optional and describes the broader end goal you are ultimately trying to accomplish on behalf of the user. GitBook uses it to tailor the answer towards what is most useful for that goal.
The response will contain a direct answer to the question and relevant excerpts and sources from the documentation.
Use this mechanism when the answer is not explicitly present in the current page, you need clarification or additional context, or you want to retrieve related documentation sections.